NT$ 10,500
首頁 » 模組化合成器 » Utility » WMD Compressor
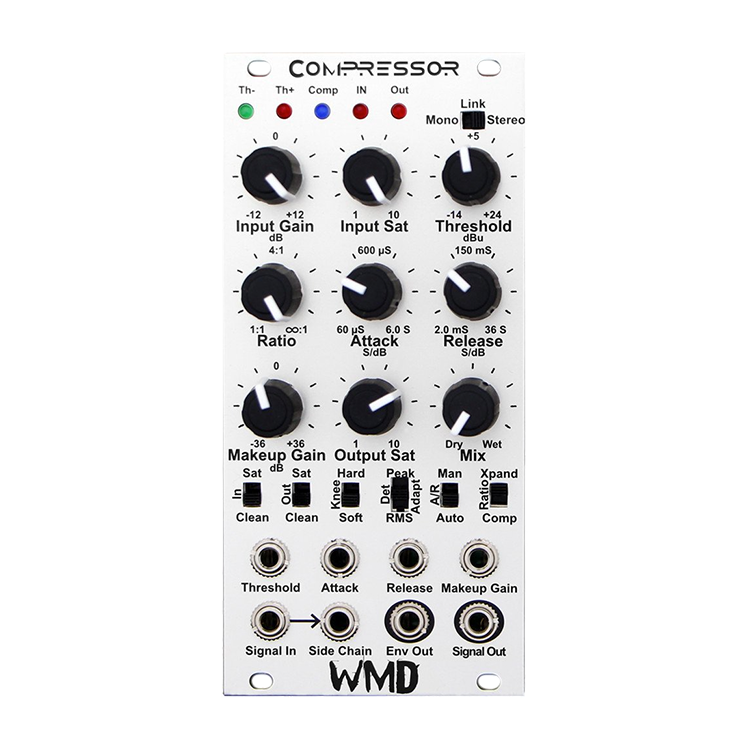

Sidechainable, analog dynamic processing
Dynamics processing is not something typically considered in modular synthesis, especially subtractive patches. With many synthesists doing fully modular feedback patches, percussion and outboard processing with their modulars, compression now has a place in a eurorack.
The WMD Compressor is designed to serve all of your normal dynamics processing needs, but it pushes boundaries further. It can subtly calm resonance peaks, or it can add dynamic character to a bass patch. It can also completely crush and distort a patch into a pumping breathing monster.
The WMD Compressor is designed around the THAT 4301 core, a high end dynamics processor. It has been adapted for modular levels, but will work with +4 line level signals as well. It is designed to be transparent, using only ultra low noise opamps, but it also has variable input and output saturation to add some character and distortion.
- THAT 4301 Forward Compressor
- Ultra Low Noise Opamps
- DC Coupled Throughout
- Input and Output Variable Saturation
- +-12dB of Input Gain
- Manual/Auto Attack and Release
- Hard or Soft Knee
- RMS/Peak/Adaptive Level Detection
- Expander Mode
- Infinite Ratio for Limiting
- CV Control
- Wet/Dry for Parallel Compression
- Side Chain Input
- Envelope Output
- LEDs for Threshold & Compression
- Stereo Operation by Linking
- 12 HP wide.
- +52mA, -40mA Current Draw
Theory of Operation
The WMD Compressor is a feed-forward design where the input signal is analyzed to determine how much compression is necessary. This architecture is powerful and fast and offers plenty of control over the compression control signal.
The signal path is short, consisting of an input gain stage, the compressor VCA stage and then the final output mix stage. The input stage uses a TLE2027 ultra low noise and low offset opamp. The VCA and output mix use OPA1641 low noise high-headroom opamps. The maximum output swing is close to the supply rails at 22Vpp.
The Manual Attack/Release circuitry is based on principles designed into the Multimode Envelope. It is incredibly fast and can range to a near stop. This allows you to use the envelope as an effect, and use the CV to halt compression if desired. Too fast of both Attack and Release times will introduce distortion as the follower attempts to follow the signal itself rather than the envelope of the signal.
The Side Chain lets you use another signal to control compression of the input. This lets you duck a bass sound for the kick, or duck a mix for voiceover work, or distort a lead when something else is happening. The Side Chain is very useful for adding dynamics to a patch quickly and easily. It also lets you use the Compressor to work in feedback mode, where the Compressor controls the input to a filter, and the output of that filter is run through the side chain; then when resonance starts to distort the signal, the input is dropped down to compensate. This allows for very smooth resonant patches.
The Input and Output Saturation circuits are voiced differently from each other. The input side saturation works with the input gain control to give a very soft clipping. Lots of 2nd order harmonics to warm your signal here. Input saturation will be present on the Dry side of the Mix control as well as be passed through to the follower and the compression core. Output saturation is active on the Compressor's VCA circuit. It can clip much harder than the input side. Output saturation is great for distorting the initial transient from a slower attack, giving the initial hit more harmonics and a punchy timbre.
The Controls
Input Gain - Sets the input level on the Signal In jack. Range is +-12dB. 12 o’clock is unity gain. This level is normaled to the Side Chain input. Input level is indicated on the red In LED.
Input Saturation - This knob and control switch determine the amount of input side saturation. The circuit is a soft clipper that begins to clip at +-4 volt peaks. Switch must be up for knob to be enabled.
Threshold - This sets the input level where compression starts to happen. Its range from -14dB to +24dB covers the modular range. There is a CV input for this control that is added to the knob value. Th+ and Th- LEDs indicate whether the input signal is above or below the compression threshold.
Knee Switch - This switch determines the threshold break point behavior. Hard knee will start compression at the specified ratio immediately at the break point. Soft knee starts compression slowly over the range of 3dB before the break point.
Ratio - Controls the amount of compression as a function of input level to output level. So, for every dB in level increase past the threshold, you get X level increase in the output. 4:1 ratio means 4dB input to get a 1dB change in output. ∞:1 is a limiter where the input signal is limited to the threshold level.
Detector Mode Switch - This three position switch selects between RMS, Adaptive and Peak level detection modes.
- RMS - Ignores fast transients, slower and smoother. Good for un-compressed attack transients. More vintage sounding compression.
- Adaptive - Smooth like RMS, but detects fast transients. Good for many types of material. Modern sounding compression.
- Peak - Very fast, follows the signal closely. Use with manual A/R with slower release for good peak limiting.
A/R Switch - This switch determines whether the manual Attack and Release knobs are activated, or if the Level Detector automatically controls attack and release times. Switch must be in Manual mode for Attack and Release knobs and CV to be enabled.
Attack - This knob sets the amount of time taken for the onset of compression. Rotate clockwise for a slower attack. Attack may be affected by the CV input. Attack is measured in Seconds / dB.
Release - Controls the amount of time to open the compressor after the input signal goes back below the current level of compression. Rotate clockwise for longer release. Release may be affected by the CV input. Release is measured in Seconds / dB.
Ratio Mode - This switch controls whether the compressor reduces output level as the threshold is crossed (Comp), or increases level by the Ratio as the threshold is crossed (Xpand). Beware that flipping to Xpand will greatly increase the volume at the output. Reduce Makeup Gain before engaging this switch.
Comp LED - This blue LED shows the compression level to give rough feedback as to how much compression is taking place.
Makeup Gain - This controls the amount of gain at the output stage. Range is -36dB to +36dB. Use higher settings to bring the level back up after high compression. If using Xpand mode, set this lower than 0dB to avoid high output levels. There is a CV input to further control the amount of Makeup Gain.
Output Saturation - This switch must be enabled for the knob to have an effect. Moderately Hard LED saturation begins at +-6 volt peaks.
Mix - This knob mixes the dry input signal with the wet output signal, allowing for simple parallel compression. Also use it as a way to compare input to output easily. This is the final output to the Signal Output jack. Its level is indicated on the red Out LED.
Side Chain - This input drives the level detector of the compressor. When nothing is plugged in, the Input signal is normaled through to the detector. This allows you to use the compressor as a ducker or expander with other signals.
Envelope Out - This output jack produces the Compressor’s control signal for use in other places in your modular.
Stereo Link - If you have two WMD compressors, you can link them together with an 1/8” cable on the back. Flipping each Compressor’s Link switch to Stereo will connect the two detectors together for true stereo bus compression. Knobs must be set the same for both channels to truly behave the same, as only the detector information is shared.
Specs:
- Power: +12V = 52mA; -12V = 40mA
- Size: 12 HP.
- Depth: 25mm.
- Every WMD product is warranted for 12 months after purchase, but please contact us if you ever have problems. We will take care of you.


使用評論:
購物須知 Q&A
Q1 . 何謂鑑賞期?
依消費者保護法之規定,網路購物享有商品到貨日起算七天猶豫期。必須提醒您,「 猶豫期並非試用期 」,鑑賞期目的為提供您檢視、參考,並非提供您商品的試用,若您收到商品經檢視後有任何不合意之處,請勿拆封使用,並立即依照退貨規定辦理退貨。商品退換貨必須是完整包裝,且勿缺漏各項配件及贈品,或自行拆損原廠包裝與外盒。若有任何遺失、損毀或是缺件,可能會影響到您的退換貨權益,也可能依照損毀狀況扣除復原之相關費用。
Q2 . 如何辦理退換貨?
若您確定要辦理退貨,請務必保持商品全新完整包裝,且勿損毀原廠外盒。包含商品本體、配件、保證書、原廠包裝、附隨說明文件等,均須包含在內,勿缺漏任何一項。若有其他可歸責您的原因,造成商品損毀,將無法辦理退貨,或須將損壞費用於退款中扣抵。但商品如有新品瑕疵問題,則不在此限,享有無條件退換貨服務。
請於鑑賞期內來電或來信,詳細告知我們欲退換貨之原因、商品現況、電話,及取件的地址,我們將於 3 - 5 個工作天內安排退貨事宜。
Q3 . 如何收到退款、需要多少時間?
依不同付款方式,退款方式與時間也不同,說明如下:
信用卡付款:待我們收到退貨商品後約 5 至 7 個工作天,款項將會退至您信用卡帳戶。請依信用卡結帳日判斷,刷退款項可能列於本月或次月帳單,退款進程請向信用卡發卡銀行確認。
匯款:請聯絡 service [at] digilog.tw 並提供您的完整匯款資料(銀行、分行名稱、銀行代號、戶名、帳號),我們將派快遞公司前去取回您的退換貨商品,並於 5 至 7 個工作天,將款項匯還至您所指定的帳戶。
Q4 . 商品維修的運費需要自行負擔嗎?
商品維修的往返運費須自行負擔。

你可能會有興趣的商品:

MIDI to CV
Intellijel µMIDI USB MIDI Interface...
Intellijel µMIDI USB MIDI Interface...
網路價
NT
8,890
網路價
NT
8,890
外殼 / 電源
Frap Tools SILTA
Frap Tools SILTA
網路價
NT
7,100
網路價
NT
7,100
-3%
VCO
Qu-Bit Electronix Scanned
Qu-Bit Electronix Scanned
NT 14,900
網路價
NT
14,500
NT 14,900
網路價
NT
14,500
-7%
Modulation
AJH Synth Precision Voltages
AJH Synth Precision Voltages
NT 10,000
網路價
NT
9,300
NT 10,000
網路價
NT
9,300

Drum Module
BASTL Instruments Crust
BASTL Instruments Crust
網路價
NT
10,800
網路價
NT
10,800
目前尚無評論